Why does documentation matter more than most people expect?
Your claim lives and dies on what can be proven visually. The first estimate an adjuster writes is based entirely on what they can see — in person or in the photos you send. If your photos show thirty visible dents, the first estimate covers thirty dents. If the real count under professional lighting is two hundred, the gap between that estimate and reality is exactly what the supplement is for. The initial photos still set the baseline for the entire claim.
Documentation also settles timing disputes before they start. Insurers sometimes question whether damage came from the storm you're claiming or from an earlier one. Photos taken within 24 to 48 hours of the storm — ideally with location metadata — draw a clear line. Without them, you're asking the adjuster to take your word, and adjusters are trained to verify rather than assume.
Photos build a clean "before" record, too. If your vehicle already had a parking-lot ding or a bumper scratch, documenting everything up front keeps the insurer from blaming those older marks on the hail and then excluding them. A comprehensive set taken right after the storm works in your favor for the rest of the claim.
Key takeaways
- Light is everything. Shoot in low-angle early-morning or late-afternoon sun — overhead light flattens dents out of the frame.
- Eight to fifteen photos. Four wide shots, two or three of the hood and roof, and four to six close-ups of the worst spots.
- A coin gives scale. A dime or quarter beside a larger dent helps the adjuster judge size — useful, not required.
- Your photos undercount. Roughly 60 to 70 percent of hail damage stays invisible until LED line-board inspection, which we do for free.
- Back it up twice. Phone, cloud, and an email to yourself — the timestamp gives the "before" record a second home.
What lighting reveals hail dents best?
Low-angle light is the single most important factor in hail-damage photography. Dents are shallow depressions in a smooth surface, and they only show up when light hits at an angle that throws a shadow. Direct overhead sun erases those shadows and hides even moderate damage. It's why a car can look fine at noon and look like a golf ball at sunset.
Early morning or late afternoon sun is your best natural light. The sun sits low enough to rake shadows across the hood, roof, and trunk — where hail concentrates. Shoot between 7 and 9 AM or 5 and 7 PM in spring and summer. If midday is your only window, park so the sun strikes the vehicle from the side rather than straight down. Even twenty degrees off vertical changes what the camera sees.
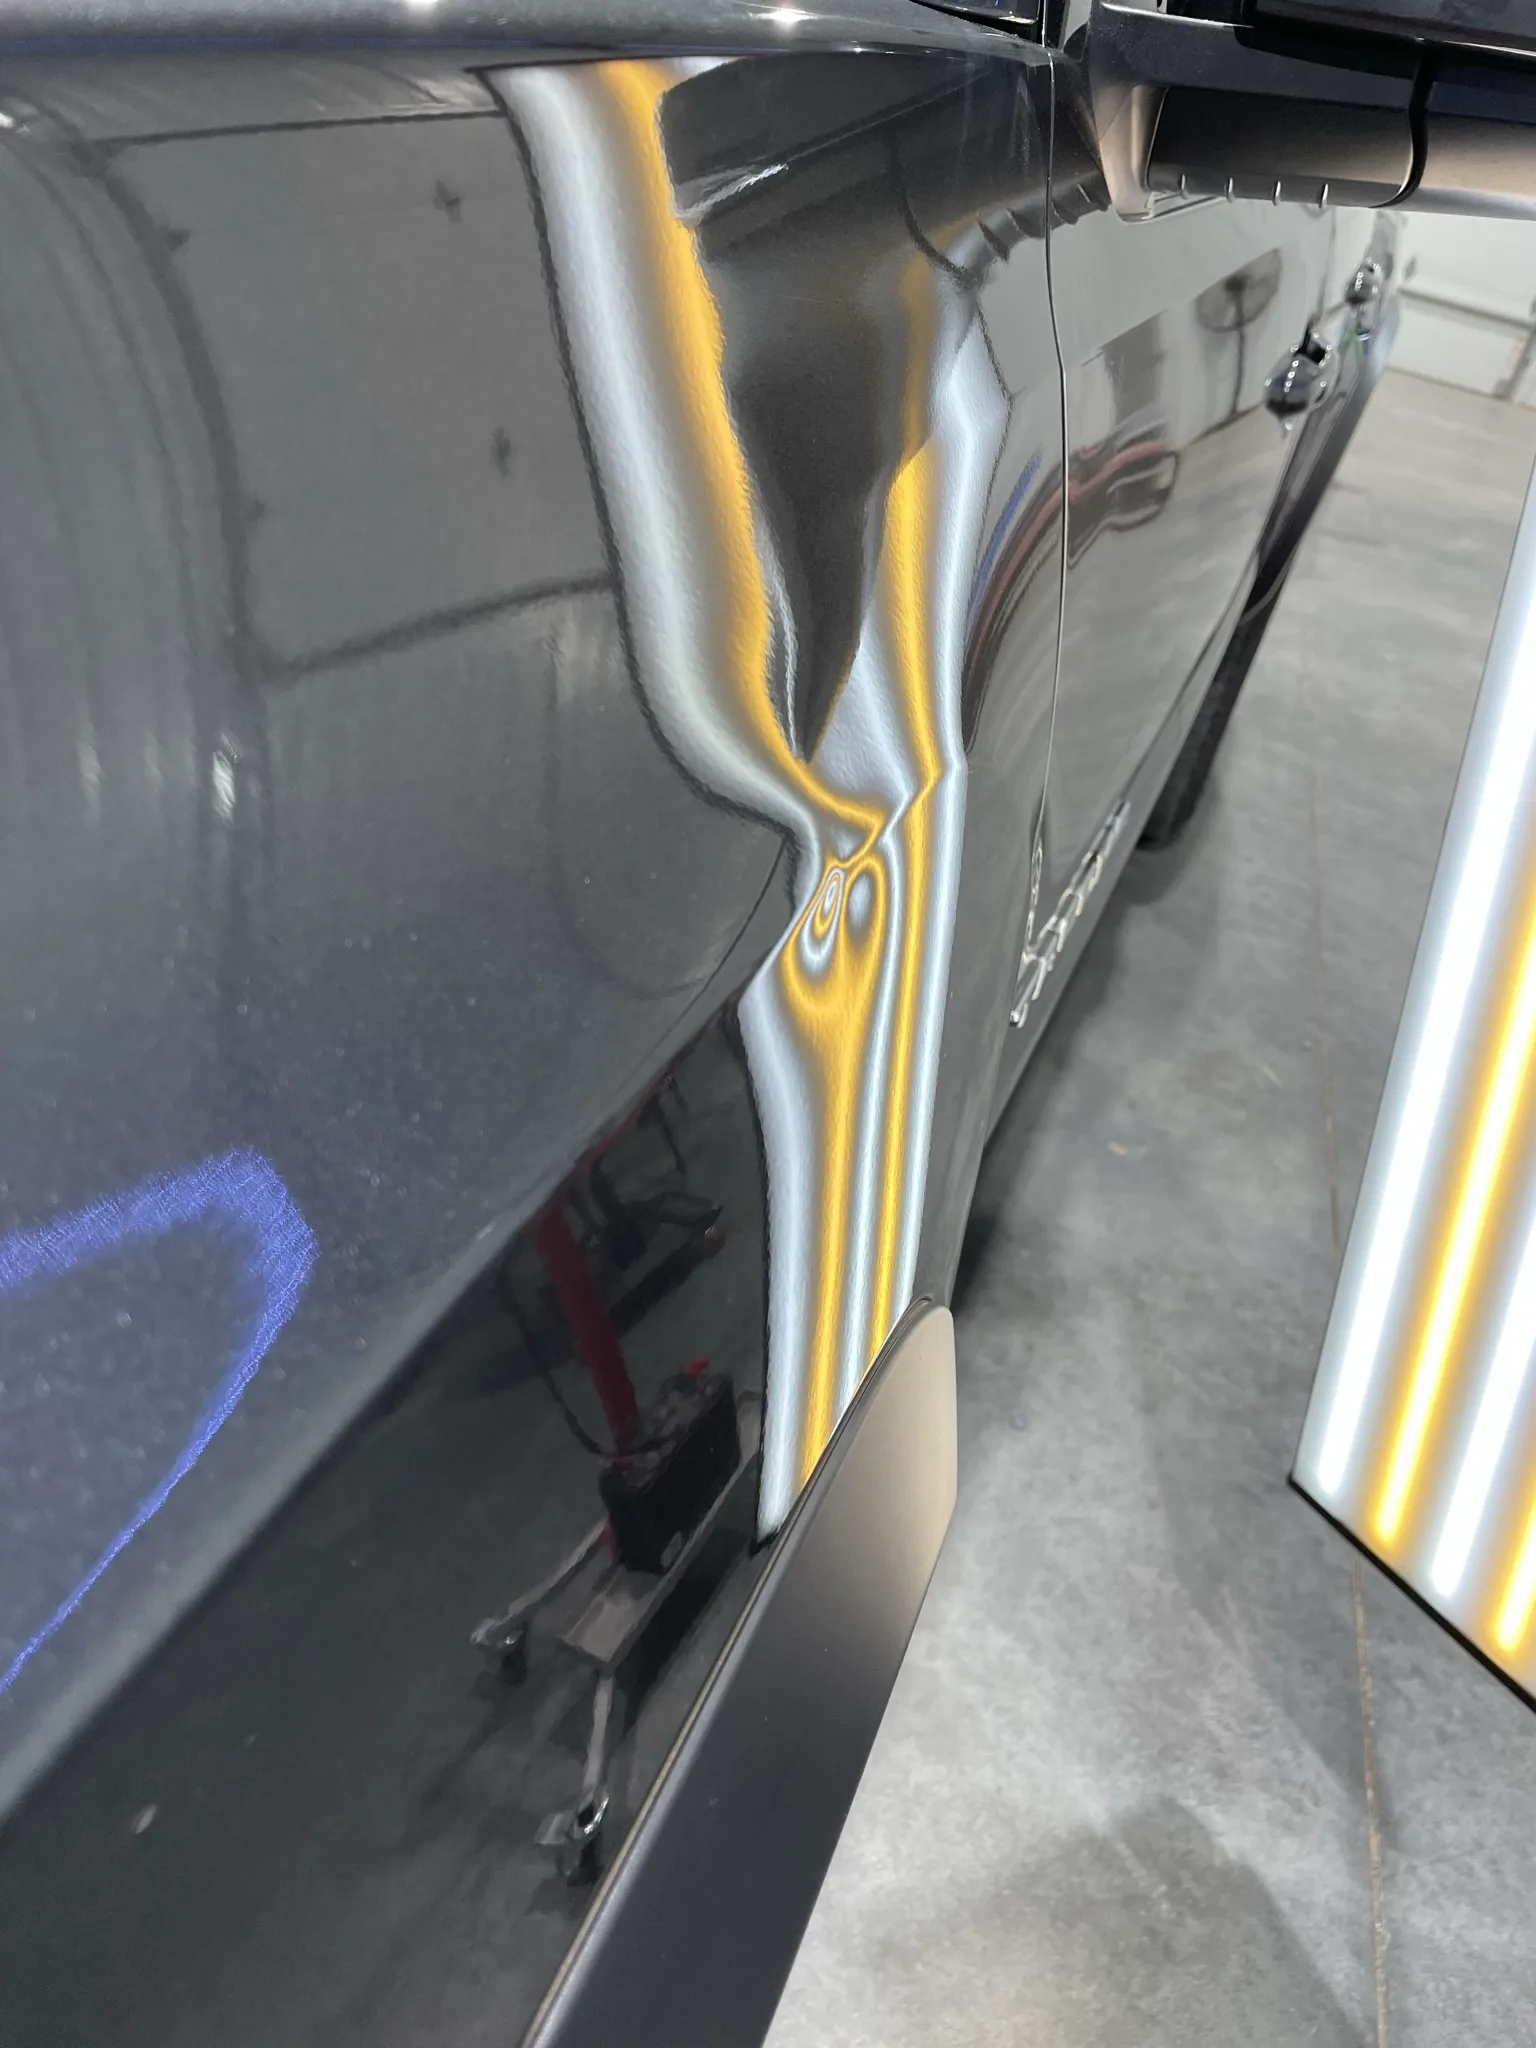
A garage works as a backup. When the light won't cooperate, pull inside and use a bright work light — a shop lamp, a high-lumen flashlight, even your phone's flashlight — held low and to the side at roughly panel height. Angle it across the surface and the dents pop into relief the same way they do at sunrise. It's a simple version of the technique paintless dent repair technicians use when they can't set up line boards.
Overcast days are workable, just not ideal. Flat cloud light softens shadows on everything, dents included. Shoot anyway — some documentation beats none — and note in your submission that professional documentation from the shop will follow. Don't postpone filing because the weather isn't perfect for photos.
What's the panel-by-panel photo sequence?
Hail hits horizontal surfaces hardest, but an adjuster needs to see every panel. Work around the vehicle in order — skip a panel and the adjuster has to guess about it, and guesses rarely run in your favor. This sequence produces the most useful documentation in the fewest shots.
- Four wide shots from 8 to 10 feet backOne from the front, one from the rear, one from each side. These orientation frames show the overall condition and the general pattern of damage. Don't zoom — keep the whole vehicle, or at least a full side, in each frame.
- Hood and roof get priority close-upsThey're the largest horizontal panels and take the most direct hits. For the hood, stand at the front bumper and shoot at a shallow angle across the surface so the dents cast shadows toward you. For the roof you need height — a stepladder, a second-floor window, the bumper of a neighboring truck. Straight-down shots from standing height show almost nothing because the angle is too steep.
- Trunk and rear deck come nextUse the hood technique: a shallow angle from behind the vehicle. If the trunk is flat, treat it like the hood. On a sedan with a curved deck, get both the flat top and the sloped rear surface.
- Each door and fender earns one shotVertical panels catch glancing hits, so the dents are usually smaller and fewer — but they're still claimable. Photograph each door from about three feet away with light coming from above or the side, and give the front and rear quarter panels the same treatment.
- Pillars, mirrors, and trim are easy to forgetPhotograph any chrome or painted trim around the windows, along the beltline, and on the mirror caps. Adjusters often miss trim on the first estimate, and having the photos makes it simpler when the shop documents it later.
How do you make a subtle dent show up on camera?
Hail dents photograph poorly because they're soft depressions in a reflective surface. Your eye catches them because your brain reads the moving light in real time. A camera freezes one flat frame and flattens those depth changes into near-invisibility. Two techniques close the gap.
- The spray-bottle method. Lightly mist the panel with water — a thin film, not dripping. The film makes dents read as slight pooling or distortion in the water pattern. Shoot right after misting, before it evaporates. It works especially well on dark vehicles, where shadows are hard to see. A 99-cent spray bottle is the best dollar you'll spend on your claim.
- The reflection-board method. Hold a large white surface — a poster board, a bedsheet, a white towel — behind you while you photograph a panel. The white reflection across the paint makes dent depressions read as dark spots in the reflected field. It's a simplified version of what our LED line boards do at the shop; the bigger and more uniform the white surface, the better the result.
Phone settings matter. Turn off HDR — it lifts shadows, which is exactly what you don't want. Tap the damaged area to focus there, not the background. If your phone has a pro or manual mode, underexpose by about a stop to deepen the shadows around the dents. Shoot at the highest resolution available; you can always downsize later, but you can't add detail that was never captured.
Is video worth adding to the photos?
A slow video pan across each major panel catches damage individual photos miss. The moving camera angle creates shifting reflections that reveal dents as the angle changes — the same way you spot them walking past a car in a parking lot. Adjusters don't always watch the video, but it's solid backup if your photos are disputed or the first estimate looks too low.
Film one continuous pan per panel. Start at one end of the hood and pan slowly to the other, about 10 to 15 seconds per panel. Repeat for the roof, the trunk, and each side. Brace the phone with both hands and narrate as you go: "Hood, driver's side, shot May 15th at 7 AM." Date and location in the audio create a timestamped record.
The whole vehicle takes about 60 to 90 seconds. Upload the clip to the same claim file as your photos. Some carrier apps take video directly; others want it emailed. Either way, having it on file strengthens the documentation at no extra effort.
What does an adjuster actually look for?
You and the adjuster look at the same vehicle and notice different things. Knowing their checklist helps you take photos that speak their language, which speeds the claim and cuts the back-and-forth.
Adjusters look for a consistent pattern. Hail damage follows one — concentrated on horizontal surfaces, spread fairly evenly across the top, easing off on the vertical panels. Damage that looks random, lopsided, or stuck to a single panel raises questions about whether it's really hail or something else, like a tree branch or a shopping cart. Your wide shots showing consistent damage across the hood, roof, and trunk establish the hail pattern at a glance.
Adjusters classify severity. They sort damage into light, moderate, or severe based on dent density and size, and your close-ups with a coin for scale let them do it fast. Light damage gets one estimate range; severe damage gets another. The quicker they can classify, the quicker the claim moves.
Adjusters separate pre-existing damage. Any dents, scratches, or chips that predate the storm have to be identified and excluded. A comprehensive set taken before any repair gives them the full picture so storm damage and prior wear don't get confused.
Why will your photos always undercount the damage?
Even in good low-angle light, roughly 60 to 70 percent of hail damage is invisible to the naked eye and to a phone camera. That's not a flaw in your photography — it's physics. Shallow dents in curved panels, micro-dents in dark paint, and edge damage on door skins simply don't throw enough shadow to register without professional equipment.
So your photos will read low, and that's expected. A vehicle that looks like it has 40 to 50 dents in your photos often shows 150 to 200 under LED line boards. The boards project a grid of parallel lines across each panel, and any deviation in those lines — even a fraction of a millimeter — reveals a dent. It's the spray-bottle principle at industrial precision.
Don't let that discourage you from photographing. Your initial photos aren't meant to capture everything; they're meant to open the claim and set the baseline. The supplement process exists precisely to bridge the distance between what your photos show and what the shop's LED inspection reveals.
Why is LED line-board inspection the gold standard?
LED line-board inspection is the only reliable way to count and map every dent on a hail-damaged vehicle. The boards project horizontal lines across each panel at a controlled distance and angle, and any break in the line pattern reveals a dent, no matter how shallow. It's the same tool paintless dent repair technicians use both to estimate and to guide the repair.
At our Olathe shop, the inspection is free and takes about 30 minutes. We photograph every panel under the boards, count and map each dent, and enter the data into the CCC ONE estimating system — the same system your insurer uses. That documentation becomes the foundation of the supplement that corrects the first estimate to reflect the real damage.
You don't have to wait for the adjuster's visit to get ours. Having our line-board documentation ready when the adjuster reviews the claim often speeds the supplement along, because they see professional-grade evidence behind every line item. Bring the vehicle by anytime — you don't need a claim number first.
How is documenting for a sale different?
If you're documenting damage on a vehicle you plan to sell rather than repair, the purpose changes — and so does the approach. Instead of supporting a claim, the documentation establishes the extent of the damage for a buyer or dealer so no one is surprised mid-transaction.
For a trade-in, take the same full photo set. Include the panel-by-panel shots, the close-ups, and the reference-object photos. Hand them to the dealer along with a written estimate from a licensed paintless dent repair shop, even if you don't plan to repair. The estimate shows the damage is cosmetic, repairable, and worth a specific figure — without it, the dealer overestimates the repair and trims your trade value to match.
For a private sale, transparency protects you legally. Both Missouri and Kansas require disclosure of known defects. Dated photos and a professional estimate show you disclosed the damage honestly. Keep copies of everything; if a buyer later claims the damage was worse than represented, your documentation is your defense.
What's the timeline for documenting a claim?
Good documentation isn't one event — it's four snapshots at different points in the process. Each serves a different purpose, and having all four creates an airtight record.
Phase one: within 24 to 48 hours of the storm. This is your initial claim documentation. Take the full panel-by-panel photo set and the video, date-stamp everything, and you've established that the damage came from that specific storm.
Phase two: after filing, before repair. If the adjuster asks for more photos, or you spot additional damage after the first submission, document it. Photograph any temporary protective measures too — a covered broken window, for example — since those may be reimbursable.
Phase three: during professional inspection. Your paintless dent repair shop's LED line-board documentation becomes the official damage record, and we include it with the supplement. You'll get copies for your own files.
Phase four: after repair. Photograph the same panels once the work is done. This final set proves the repair happened, confirms the factory paint was preserved, and gives you a clean record for any later inspection — a lease turn-in, a resale, or a future hail event on the same vehicle.
How does your documentation feed the supplement?
Supplements are how a claim moves from "first estimate" to "actual repair cost." That first number — from your photos or the adjuster's quick look — almost always undercounts. Supplements close the gap, and every supplement needs supporting documentation.
When we submit a supplement, the package carries LED line-board photos, panel-by-panel dent maps, CCC ONE-format estimates, and comparison images. The comparisons show the insurer what their adjuster documented next to what our inspection found. That side-by-side evidence is what moves a supplement from request to approval in a day or two instead of weeks of back-and-forth.
Your initial photos play a supporting role here. They fix the timeline, confirm the vehicle's condition at the time of the storm, and give context for the professional inspection that follows. Both layers together — your photos and our inspection — make a stronger case than either one alone.
What does Bryan tell every customer to do first?
Take your photos, then call us, then call your insurer — in that order. The photos preserve the evidence while conditions are fresh. Calling us gives you a realistic read on the damage before you file, so you know whether filing makes sense. By the time you reach your insurer, you have both the documentation and the context to guide the conversation. You file the claim; we never file it for you.
Don't wait for perfect conditions. If the light isn't ideal, photograph anyway. Imperfect documentation beats none, and you can always reshoot later in better light — but the "before" condition can only be captured before anything changes, before a car wash, before the next storm, before any repair attempt.
Store everything in at least two places. Phone, cloud backup, and an email to yourself. A phone that dies or gets replaced before the claim closes takes your documentation with it unless you've backed up. Emailing the photos to yourself the day you take them gives the timestamp a second home.
Use the Claim Wizard and upload your photos directly — we'll review them and tell you whether professional line-board inspection is the next step. Or call (816) 451-1455 for a free inspection at our Olathe shop. Either way, the documentation gets handled right from day one.